


Mother's Day, for us, isn't about grand gestures. It’s simply an opportunity to say thank you – to moms, grandmothers, or those favorite people who support us in our daily lives. And what could be more personal than a gift children have gathered from nature with their own hands? When you head out into the woods together, search for branches, feel the wood, and then work on a project at home, the gift is basically finished before it’s even handed over. It’s the time spent together that holds the real value and stays in our memories.
For this Mother's Day, we’ve teamed up with our namuk ambassador Gabrielle from @kindwaldundwiese to come up with something special: carving hearts from forked branches. It’s a project that beautifully shows how we can create something unique using simple resources found right outside our front door. Of course, these aren't just great for Mother's Day – they’re perfect for Valentine's Day, birthdays, or just as a little "thinking of you" gift, especially during spring and summer when paired with fresh flowers.
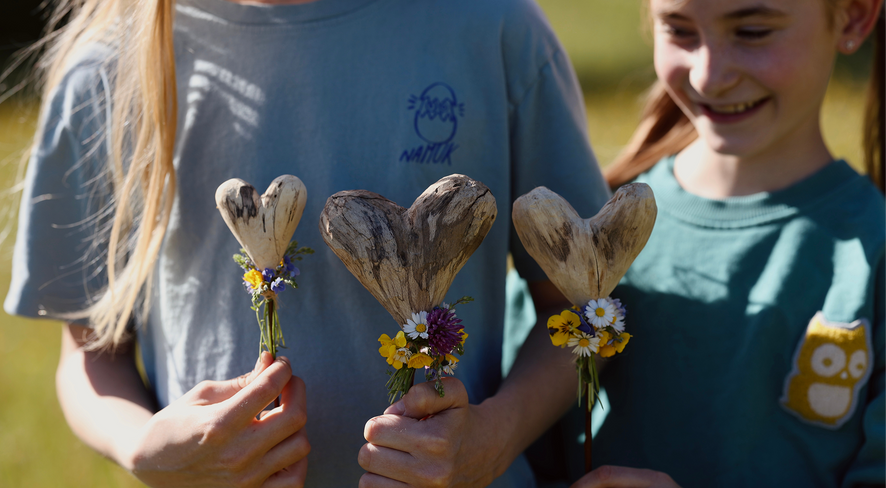
Made outside, given from the heart
We carve these hearts from branches found on the forest floor. Our tip: specifically look for forked branches that are already a bit decayed. Slightly soft, punky wood has the big advantage of being much easier for children’s hands to work with – it gives way more easily, and the shapes emerge quickly. Since every forked branch is unique, every heart becomes a personal masterpiece.

This project is perfect for children from about 5 – 6 years old, provided they are accompanied by an adult while carving. But teenagers enjoy it too. It’s a fantastic way to train fine motor skills and hand-eye coordination while practicing concentration and patience along the way. And the boost in self-confidence a child gets when they proudly say, "I made this myself!", is irreplaceable.
Please note: Children should only carve together with adults and use appropriate tools. Carrying out this activity is at your own responsibility.
What you’ll need
Everything you need for the heart can be found directly in nature.
- A forked branch (ideally a bit decayed)
- Carving knife (or a pocket knife, ideally with a saw)
- Saw
- Sandpaper
- Hand drill
- A thin twig to use as a stem
- Red colored pencil for marking
- Optional: Paints, jute twine, or cotton yarn for decoration
Step-by-step: How to create your wooden heart
Find and prepare: Look for a suitable forked branch on the ground. Shorten the two side branches with the saw to your desired length. Leave the main branch as it is for now – it will serve as a practical handle while carving.

Round the ends: Use the large blade of the knife to round off the ends of the side branches. Keep making short cuts along the edge, turning the wood slightly after each cut until you have a nice hemispherical shape.

The point of the heart: Use the red pencil to mark the point of the heart – draw two diagonal lines from the left and right that meet in the middle. Then saw along these lines to separate the heart from the main branch.

Carve the final shape: Now you can use the large blade to bring the heart into its final form. Be careful not to carve the bottom point too sharp, as that’s where the hole for the stem will go later.

Sanding: Smooth the heart all over with sandpaper. This often reveals a beautiful wood grain.

Inserting the stem: Find a thin, straight twig. Drill a matching hole into the bottom of the heart and insert the twig. For us, it held perfectly without any glue.

Decoration: Tie a small bouquet of meadow flowers and attach it to the stem just below the heart using jute twine or a long blade of grass.

Why we love this project
When crafting with kids, it’s not about perfection – it’s about the process. If children of different ages are involved, the project can be easily divided: the younger ones find the branches, gather flowers, and tie the bouquets, while the older ones (always under supervision) handle the carving. This way, every child contributes to the gift.
By the way: our kids loved their hearts so much they wanted to keep them for themselves. That’s totally fine – they just ended up carving even more to give away.
Have fun searching, carving, and giving!


